Saturday 21 December 2013

Facebook Sample Question and my 20 min Solution in C++


While surfing on the internet and a bit of facebooking I came across facebook's university careers page. At the end of that page I found a link to facebook programming challenge . While reading the guidelines, there was a link to  their sample test. I was not in the mood of taking the actual test but i wanted to try the sample question. So I opened the sample test page and the question was as follows:
  • Task: 
    Find the missing term in an Arithmetic Progression.
     An Arithmetic Progression is defined as one in which there is a constant difference between the consecutive terms of a given series of numbers. You are provided with consecutive elements of an Arithmetic Progression. There is however one hitch: Exactly one term from the original series is missing from the set of numbers which have been given to you. The rest of the given series is the same as the original AP.  Find the missing term.
Saturday 30 November 2013

Running jnlp ( java webstart ) files on linux [ubuntu]

Few days back, I had to use a plagiarism detection software , known as JPlag , for some obvious reasons. The client program for jplag is available as JNLP file.

I was previously a windows' user ( currently running linux ) so my expectations were that  I only had to click on that file ( after download ) to run it. But, unfortunately that wasn't the case.
As I have switched to ubuntu 12.04 and I had no plans for installing Windows on my system again. So I had to search for a solution .

In an ideal scenario the following command in the linux terminal would suffice.

> javaws <filename>

Saturday 19 October 2013

8086 Assembly Debugging with AFD - Advance Full Screen Debug [PART 2 - Advance]


In the last tutorial we have covered some basic features of AFD  to get you started . Lets look at some advance features that will make debugging 16 bit assembly programs less painful.

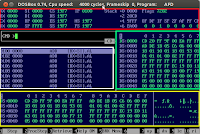
This image is from last tutorial in which we divided the AFD display into four regions.
1- Registers
2- Disassembly
3 & 4 - Memory Window 1 & 2
The features are explained with examples ( where necessary ) below.

Navigation 

The very first thing that I will write about is how to change content of these regions without typing a command in CMD.

Saturday 21 September 2013

8086 Assembly Debugging with AFD - Advance Full Screen Debug [PART 1 - BASIC]

As most of modern debuggers like IDA, Oledbg and Windbg seems to fail in debugging old 16 bit COM files.  I began researching on different debuggers available today to debug those 16 bit executables ( I am refering to COM files here )

While, doing my research I found a list of debuggers that are available these days to debug 8086 programs. Some of them are listed below

  • TR      -  ( no official link available + shareware)
  • grdb    -  Kind of an enhanced version of debug.exe ( discontinued after Windows XP )
  • Insight - The one with the most user friendly interface

There was another debugger that I couldn't find on the internet and that I used when I wrote my first 8086 assembly program in my university. It is Advance Full Screen Debug a.k.a AFD.

Saturday 14 September 2013

Setting up AFD, NASM and DOSBOX for 8086 assembly ( Step By Step )

1- NASM

Download NASM ( Click on this link ) and install it.

Now open the cmd and change your directory to the installation folder using these instructions
> C:
> cd C:/tutorial/NASM
First instruction is for changing the drive to C if you are in any other drive.
Second instruction is to change current directory to our installation directory. In my case I have installed nasm in "tutorial" folder of C drive.
Now you will have to put all your ASM files in this folder to assemble/compile them .

Alternatively, you can just go to the installation directory through WINDOWS EXPLORER and click/run "nasmpath.bat" file . This will setup path ( skipping everything we discussed above ) and open a new console/cmd/command prompt for you.
Now you can run nasm from anywhere in the cmd. but you will have to be in the directory where your code files are placed.

2- AFD

Now download AFD  and copy it to the installation folder i.e. where your nasm is installed